
Check-out retail items in seconds.
Step 1: Create a new invoice for walk-in customers
In Customer Invoice, you can check out new retail items.
- Invoice Date - This is defaulted to today's date. If you are adding a payment for a different date, click to select a different date.
- Customer - Search for walk-in in the customer field to record a walk-in customer. If you'd like to track the payment history of all retail customers, you can add a customer. Search for an existing customer by entering keywords such as name, dog name, breed, phone number. You will see a drop-down list of all customers that match the criteria.
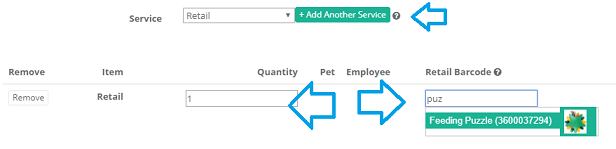
- Service - Select retail and click on Add Service. Once clicked, you will see a new invoice item added to the check out list below. You add unlimited invoice line items. To remove an item, click on Remove.
- Quantity - If a customer is purchasing multiple numbers of the same retail items, you can update here.
- Retail Barcode - You can either use a retail barcode scanner or search by keyword to input the retail product. If you are use a retail barcode scanner, click on this box and simply scan. If you don't use a retail scanner, you can search by product name, price, barcode and so on and you will see a drop down list of products that meet your search criteria.
- Cost - Once the product is found, the price is automatically updated. If you'd like to change the price on the go, you can simply update this field. Click outside the box or press tab when you are done.
- Discount - If there is a discount or surcharge in % or amount, you can enter here.
- Tips - If there is a tip, enter here.
- Payment Method - Choose the correct payment method. You can add or remove payment options in Admin > Payment Options.
- Tender = Due - If the balance is paid in one payment method, simply click on this button to populate the payment total for you. Check to see the amount below is correct (Amount owing =0, change due = 0).
- + Add Split Payment - If the customer is paying using multiple payment methods, click on this button to record accordingly. You can add unlimited payment methods to an invoice. Check to ensure the amounts below are correct (Amount owing = 0, change due =0).
- Save Invoice - If you'd like save the changes for now and revisit later, click on Save Invoice. Once saved, you can find it under Customer Invoice > Open Invoices.
- Close Invoice - If the payment has been received and invoice is closed, click on Close Invoice. Once closed, you can find it under Customer Invoice > Paid Invoices. Paid invoices are included in Daily Operations > Daily Income for end of day income reconciliation.
Step 2: Add to an existing invoice
Once a customer is checked-in at Check-in Dashboard, an invoice is automatically opened for you if a balance is due. Follow the link to go to the saved invoice. Alternatively, you can find it under Invoice > Saved Invoices.
To add retail items at check out, simply choose retail as service, and click Add Service. Please see above on how to fill out an invoice.