
Automated reminder is a great way to reduce your workload and no shows.
Step 1: Confirm your email Address
In Marketing, by default, the reminder emails will be sent from our support email address. Alternatively, you can update your email address, so we can send reminder emails on your behalf. Once updated, you will receive a verification email from Amazon AWS, our email service provider. Follow the steps to complete the verification. If you do not see the email, please check your Junk Email folder.
Note: Please note that company emails are preferred. Yahoo Email does not support Amazon AWS E-mail.

Step 2: Enable Appointment Reminder
You can customize when the reminders are sent out prior to the appointment day.

You can also fully customize the email template.
Note: When customizing the email templates, you can use Ctrl+F to find the exact text to update. Be careful not to update the HTML tags. If you need help, please contact support or your advisor.
Step 3: Enable SMS/Text Reminders
Please contact us to enable this option.
Please note that a small add-on fee is required for SMS/Text reminders.
You can test the email or SMS templates at the bottom of the page.

Step 4: Track Reminder Status in Daily Booking Page
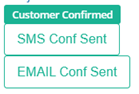
In the daily booking page accessible through the top search box, you can find the reminder status at the bottom of the daily booking page, Current Bookings. Under the customer name for each appointment, you can find links to the exact email confirmation and SMS confirmation sent to the customers.
If the customer has confirmed the appointment by following the link in the reminder template, you can also find the Customer Confirmed icon.
New feature:
You can now send individual appointment reminders for any appointment on the daily calendar page. See details here.